Instant Text V Pro — The Line Reporter
The Line Reporter
The Line Reporter is a new tool to manage the data base of individual line counts created with Instant Text. It makes it very easy to view various reports and to generate invoices.
The Line Reporter allows the creation of reports in many ways:
- You can specify the columns you want to print,
- Choose the period covered by the report,
- Choose the clients covered by the report,
- Choose which columns you want to be summed,
- Create of a report file which can be later edited,
- Define and save various report configurations...
The Line Reporter Main Screen
The main screen shows a report on line counts from the database.
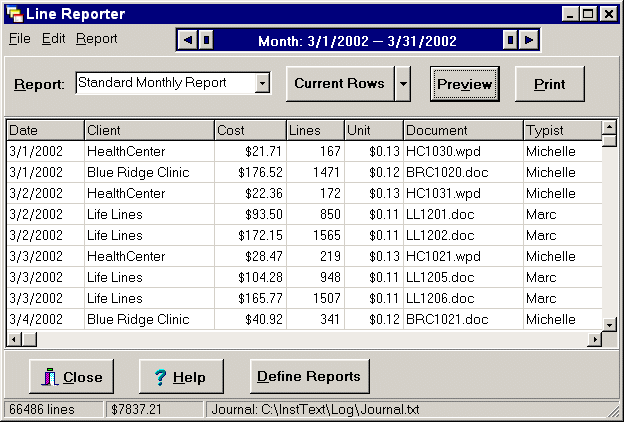
Reports can be instantly viewed, very much in the same way as in programs such as Quicken and QuickBooks. They can also easily be printed or exported in a form that allows them to be merged with Word or WordPerfect documents. Below is an explanation of several things you can do:
- The Report Dropdown Box
- allows the selection of an existing report, here: Standard Monthly Report. When you select a report, the results are shown in the table and it displays the columns and the data that are included in the report. You can use the Current Rows/All Rows button to switch between the report rows and the full Journal data (all rows).
- The Preview Button
- shows what reports will look like when they print. The Line Reporter automatically adjusts the widths of the columns in the printed report so that they all fit on the page. You can print the report from within the Preview screen, and you can also save the report file for further editing in word processors such as MS Word and WordPerfect. You can print a report with the Print button.
- The Define Reports Button
- opens the Define Reports dialog, where you can manage and create new reports and manage existing ones.
Thee Line Reporter also contains functions to edit records and to backup Journals for certain periods of time or by other user-defined criteria.
The Define Reports Dialog
The Define Reports dialog allows you to create, modify, and save reports.
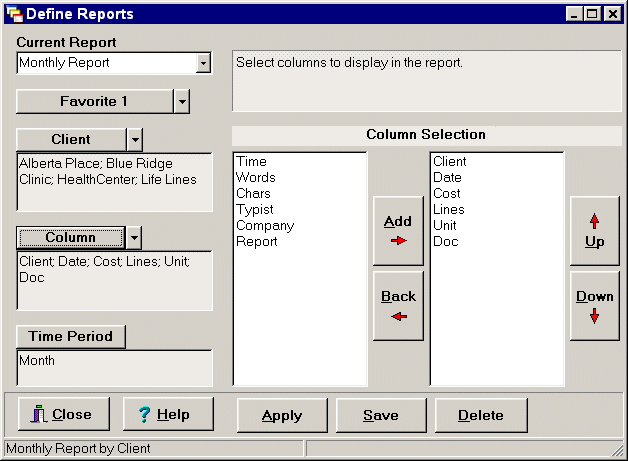
The dialog opens to the currently selected report. You can select a report using the dropdown box, just as you can on the Line Reporter main screen. Below is an explanation of several things you can do:
- The Selection Area
- is where you specify what the report should contain. Using the buttons on the left, you can change which part of the report you want to work on and what appears in the selection area. The first two buttons have alternatives to work with related parts of the report.
- Clients, Companies, and Typists
- are selected with the top button . You indicate which one you want to work on by clicking the small arrow next to the button, and choosing from the list that appears. Your current selections appear in the box below the button, so that as you change the selection area, you can see at a glance what choices you've made.
- Columns, Titles, and Totals
- are selected with the second button on the left in a similar manner. You can select the columns that will appear in the reports, assign titles to appear at the tops of those columns, select the columns that will be totaled in the report, and add text to the report.
- The Time Period
- is selected with the third button on the left. This can be by day, week, month, quarter, year, and so on.
- Apply and Save.
- Once you have made all your selections, you can press Apply and see the results in the table on the main screen. When the report is the way you want it, press Save to save it. You can also save it with a different name to create a new report.
- Define Favorite Buttons
- The Favorites button, at the top left of the Define Reports screen, lets you associate a report with up to six "Favorite" buttons of the main screen. Favorite buttons are hidden until you define them. Once defined, they allow you to quickly select and run a favorite report.
Defining a Family of Reports
A new report is always created by modifying an existing report and saving it with a new name. In this manner you can define a full hierarchy of useful reports. Here are a few examples:
- Start with the Standard Report
- Select the columns you want and save it as Cost Report
- Use Cost Report to define Cost Report Yearly
- Use Cost Report to define Cost Report Monthly, and then
- Define Cost Report Monthly - Dr. Jones
- Define Cost Report Monthly - Marblehead
Here is the hierarchy again in an outline form that shows related reports indented under their parent report:
- Standard Report
- Cost Report
- Cost Report Yearly
- Cost Report Monthly
- Cost Report Monthly - Dr. Jones
- Cost Report Monthly - Marblehead
This is just an example and you can continue defining other reports in the same way as you need them...
Previewing and Printing Reports
We end this section by showing the kind of reports you can prepare with the Line Reporter. Here is an example, as it is displayed when you press the Preview button:
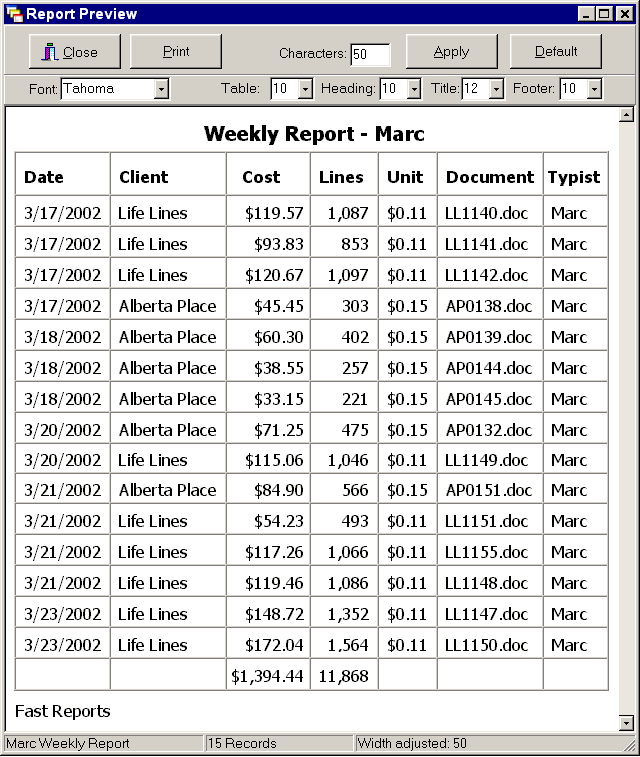
You may adjust the fonts and font sizes for the various parts of the report before printing it. You may also save the report as a file (in html format) and include it in an MS Word or WordPerfect document to prepare an Invoice. As said by an early user of Instant Text V Pro:
Preparing a bill has gone from a one-hour task to a less than two-minute task!
| Next: The Importer | Instant Text Home |