Instant Text Mobile Options and Advanced Features
Contents:
- Introduction to Instant Text Mobile
- Instant Text Mobile Options
- Advisories
- Applications
- Command Bar
- Operations
- Working with Glossaries
- The Glossary List
- The Glossary Viewer
- The Entry Editor
- Adding Multiple Entries
- Macros – Using Macro Keys
- Macros – Special Functions
- Launch Macros
- Tap Macros
- Working with a Keyboard
- The Instant Text Function Key — Menu-Menu
- Instant Text Keyboard Commands
- Using the Menu with a Keyboard
- Selecting in Advisories with a Keyboard
- The Importer for Instant Text Mobile
- Registering Instant Text Mobile
Introduction to Instant Text Mobile
When you start Instant Text Mobile, it displays the Main panel as shown below, with the activation state (Active or Not active), and the Glossary List with the Current Glossary highlighted.
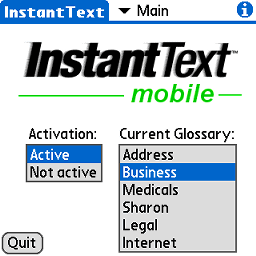
Next to the Instant Text title is a drop-down list with several panels providing access to Instant Text's main options and functions:
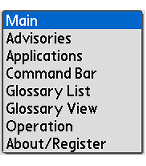
Advisories, Applications, Command Bar, and Operations are panels for setting options of Instant Text Mobile. Two other panels are for dealing with glossaries: Glossary List and Glossary View. The last one is the About... panel.
In what follows, we start by reviewing options.
Instant Text Mobile Options
Advisories
The Advisories panel lets you set several options for advisories.

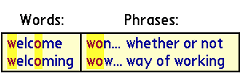
First you can choose the layout. You can have stacked avisories, with the Words advisory on top of the Phrases advisory as in the picture on the left. Alternatively you can choose to have advisories side-by-side as shown below:
The dialog also lets you specify the number of lines for Words and Phrases. In the case of stacked advisories, the two numbers can be different. Selecting 0 lines hides an advisory.
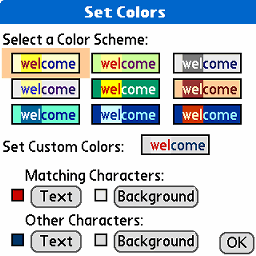
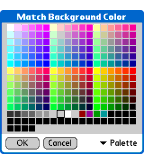
A tap on Set Colors opens a dialog that allows you to select among nine predefined color schemes. You can also decide to set your own Custom colors. For this, select the text colors and background colors for matching characters and other characters. Each of the buttons opens a color picker dialog:
Applications
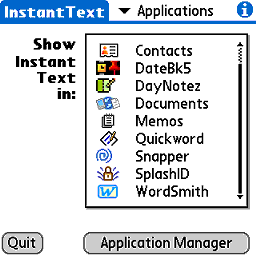
The Applications panel lets you select the applications in which Instant Text Mobile is to display advisories and provide expansions. Initially, the list is preset with a default list of popular applications that use text. To refine the selection, tap on Application Manager:
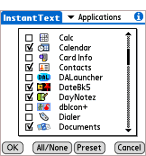
You can select applications one by one with the checkboxes. The All/None button toggles between all applications and no application. Tap on the Preset button to go back to the default list.
Command Bar
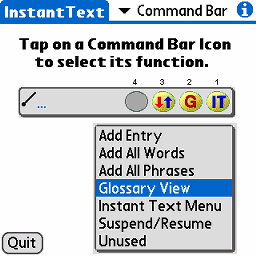
A tap on any of the icons at the positions 1 through 4 opens a menu allowing you to select a function for that icon. Once a function is selected, the dialog shows the icon for the function.
The example shows a command bar using three icons: the Instant Text Menu at position 1, the Glossary Viewer at position 2, and Suspend / Resume at position 3.
Select Unused if you do not want to use an icon. Do it for all four icon positions if you do not want to use the Command Bar.
Operations
The Operations panel contains several options that allow you to change the way Instant Text Mobile operates.
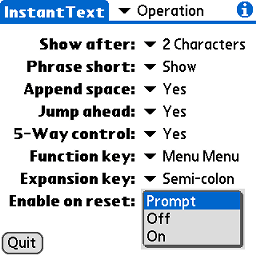
Show after: This allows you to specify the minimum number of characters that must be typed for suggestions to appear in advisories.
Phrase short: Either "Don't show" or "Show."
Append space: If Yes, Instant Text appends a space at the end of an expansion. Any space appended in this way is cancelled if the next key entered is a punctuation mark.
Jump ahead: If Yes, Instant Text uses the Jump Ahead technique described in the introduction.
5-Way control: If Yes, you can use the 5-Way navigator to select advisory lines and choices of the Instant Text menu.
When this option is selected, the current selection is indicated by a small bullet on the left. Pressing the center button expands the current selection. Up and Down move the selection one up or one down. Pressing Left or Right toggles between the Word and Phrase advisories, or in the menu, between commands and the glossary list. On a keyboard, this works also with direction keys.
Function key: Either "None" or "Menu-Menu."
Expansion key: Either "None," "Semi-colon," or "Colon."
Enable on reset: This defines the behavior of Instant Text Mobile after a soft reset of your Palm device. Prompt means that you will be prompted after a reset and can decide at that time whether to reactivate or not. Off means that Instant Text Mobile will not be active. On means that Instant Text Mobile will automatically be reactivated (not recommended).
Working with Glossaries
You can have many glossaries on your Palm device, as long as you have enough memory, but we can make a distinction in terms of the speed it takes to use them:
- Access to the Current Glossary is immediate: As you type, advisories display suggestions based on its entries.
- Access to another glossary of the Glossary list is slightly slower: A few taps are needed to show the Command Bar and the Instant Text Menu, and then select it as the new Current Glossary
- Access to a glossary that is not in the Glossary List is again slower: It must first be added to the Glossary List as we will see now.
The Glossary List
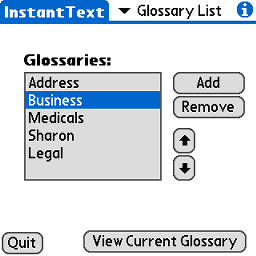
Managing the Glossary List is done from this panel. You can add glossaries or remove them from the list, and you can order them. You can also select the Current Glossary.
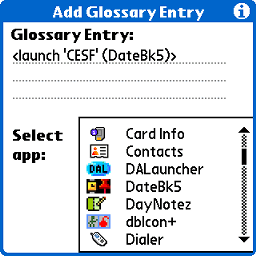
A tap on the Add button brings up the Add Glossary to List dialog:
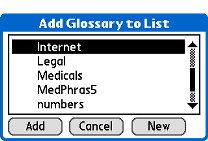
The dialog shows all glossary pdb files currently in memory. You can select one of them and tap on Add to add it to the Glossary List. You can also create a new (empty) glossary by tapping on New.
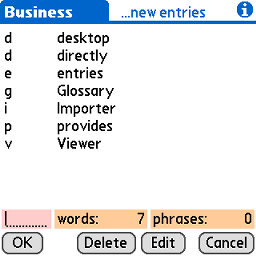
The Glossary Viewer
A tap on the View Current Glossary button of the Glossary List panel brings up

The Viewer shows all entries in a tabular form, with the preferred short form on the left and the expansion on the right. The number of of Word and Phrase entries are shown on the bottom line.
The Find editor at the bottom left provides a quick way to locate glossary entries by typing a few letters. For example, typing the letters iwa highlights the entry whose short form starts by these letters: "it was a pleasure."
A tap on the Find editor locates the next match. If there are no other matches with short forms, matches with expansions are shown. For example, typing quest in the Business glossary finds an entry whose expansion include the word "question" as there is no entry with this short form in the glossary. Repeated taps on the Find editor locate other entries that include that word.
A tap on List goes back to the Glossary List panel.
The Entry Editor
Variations of the Editor dialog are used for adding, editing, and deleting entries.
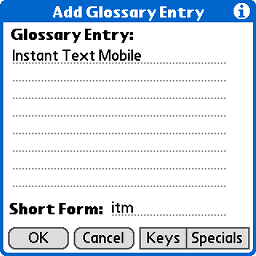
A tap on Add brings up this variation of the Entry Editor. As you type the words of the entry you want to add, the preferred Short Form is prefilled with the initials of the words you enter. You can modify it if you want.
For editing, a similar dialog is displayed with "Edit" in the title instead of "Add." Similarly, the dialog for deleting indicates "Delete." In addition, it asks for confirmation of the deletion.
A fast way to open the Add dialog is to set its icon ![]() in the Command Bar. Then a tap on the icon opens the dialog prefilled with the currently highlighted text.
in the Command Bar. Then a tap on the icon opens the dialog prefilled with the currently highlighted text.
The Keys and Specials buttons are used for writing entries that work as macros.
Adding Multiple Entries
Powerful ways to add a large number of entries at the same time are provided by the companion desktop program, The Importer for Instant Text Mobile.
You can also add multiple words on the Palm device itself by selecting a portion of a document and executing the command Add All Words to add all words contained in the selection. Similarly, you can add all phrases of the selection with the command Add All Phrases.
Execution of either of these commands brings up a modified Glossary Viewer dialog that shows only the new entries about to be added. You can then edit or delete some of them and tap on OK to confirm the addition of the remaining ones to the glossary. You can also tap on Cancel, should you decide not to add any entry.
The commands Add All Words and Add All Phrases can be added to the Command Bar. They can also be called with the keyboard commands Menu-Menu-W and Menu-Menu-P.
Macros — Using Macro Keys
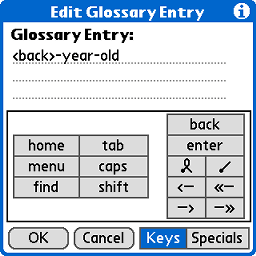
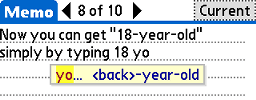
A glossary entry may include macros such as the backspace macro in the example on the left, which appends -year-old to the current text.
The macro ‹back› before the initial hyphen deletes the last character before adding
To add macros such as ‹back›, tap on the Keys button in the editor. This displays the available key macros. Then tap on the button for the desired macro.
The table below shows all keys, the macros they generate, and their actions:
| Key | Macro | Action |
| home | ‹home› | Application launcher |
| menu | ‹menu› | Opens menu |
| find | ‹find› | Opens find dialog |
| tab | ‹tab› | Tab key |
| caps | ‹caps› | Caps lock key |
| back | ‹back› | Backspace key |
| enter | ‹enter› | Enter key |
| ‹shortcut› | Shortcut key | |
| ‹command› | Command key | |
| ‹– | ‹left› | Cursor left |
| –› | ‹right› | Cursor right |
| «– | ‹fastleft› | Left double arrow |
| –» | ‹fastright› | Right double arrow |
The shortcut key is allowed both as a prefix and as a postfix key. This means that you can use either ![]() ds or ds
ds or ds![]() for the date stamp.
for the date stamp.
The left and right single arrows are used to cursor one character left or one character right. The effect of the double arrows depends on the cursor position:
- For a field, the left double arrow moves to the field before, the right double arrow to the field after.
- For text, the left double arrow moves to the line before, the right double arrow to the line after.
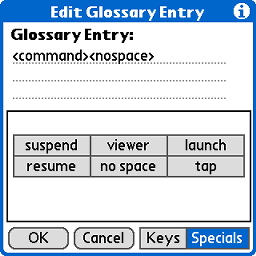
Macros — Special Functions
A tap on the "Specials" button displays a panel with additional macros.
Most of the time, you want Instant Text, to append a space after expanding an entry. To avoid this for a given entry, end it with a ‹nospace› macro.
This example shows a use of this macro. If you use a keyboard that does not offer a ![]() key, you can define this entry to issue a command key:
key, you can define this entry to issue a command key:
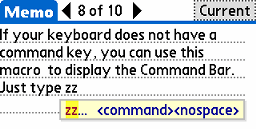
A tap on the advisory expands the entry and displays the Command Bar. The two letters zz are erased and no space is added.
The table below shows the special functions and their actions:
| Macro | Action |
| ‹suspend› | Suspend Instant Text Mobile |
| ‹resume› | Resume Instant Text Mobile |
| ‹viewer› | Open the Glossary Viewer |
| ‹nospace› | No space after expansion |
| ‹launch› | Launch an application |
| ‹tap› | Simulate a tap |
The ‹launch› and ‹tap› macros allow some degree of automation to be achieved by the expansion of a glossary entry. They are described below.
Launch Macro
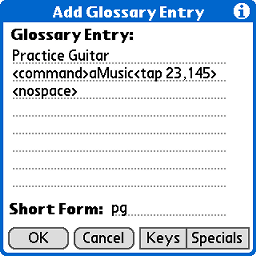
A tap on "launch" on the Specials panel displays a list of applications. Then a tap on one of the applications enters it as a ‹launch› macro in the editor. The example shows a glossary entry with a macro launching DateBk5.
(Do not try to write a launch macro by typing its name. Using the launch special key is easier as well as safer.)
Tap Macro
A tap on "tap" on the Specials panel creates a ‹tap› macro to produce a tap on a button. You are then asked to tap on the screen at the desired position, which is then encoded as coordinates in the macro.
The example shows a possible use suggested by jazz guitarist Steve Carter. Typing pg within Calendar displays an entry that creates a
Opening the note editor is done by
As this example shows, ‹tap› macros allow some powerful automation. One limitation is that they can only to be used to tap on buttons. They cannot be used to select an item of a list.
Working with a Keyboard
All functions of Instant Text Mobile are accessible by a keyboard interface that does not require the use of a pen. This covers the use of thumboard machines such as the Treo 650, as well as the use of a foldable keyboard. In addition, several of these keyboard functions can be equally useful when using a pen. Below are the main components of this interface.
The Instant Text Function Key — Menu-Menu
Several commands specific to Instant Text take the form of a special key � the Instant Text Function key � followed by a letter. As Instant Text works with a variety of applications, it cannot preempt any key that might be used by these applications. The solution is to use the succession of two Menu keys: pressing twice on the Menu key on a thumboard or keyboard, or tapping twice on the Menu key of a virtual keyboard.
Instant Text Keyboard Commands
The table below shows several commands that can be activated with Menu-Menu followed by a letter:
| Command | Action |
| Menu-Menu A | Add an entry |
| Menu-Menu C | Clear the advisories |
| Menu-Menu D | Dodge the cursor |
| Menu-Menu G | Glossary Viewer |
| Menu-Menu L | Display the Glossary List |
| Menu-Menu M | Display the Instant Text Menu |
| Menu-Menu P | Add All Phrases |
| Menu-Menu R | Resume Instant Text |
| Menu-Menu S | Suspend Instant Text |
| Menu-Menu W | Add All Words |
When using a pen some of these functions can be done with Command Bar icons. Using these commands reduces the number of icon positions needed. The effect of most of these commands is described elsewhere (follow the links). The three remaining ones are:
Clear: Clear the advisories.
Dodge: This command toggles the position of advisories between a top position and a bottom position. In most applications, the use of this command is unnecessary as Instant Text Mobile positions advisories in a way that does not overlap the cursor. Dodge may be useful when using Instant Text Mobile with applications such as Documents To go that do not publish the position of the cursor to other applications.
Suspend: Suspend the display of advisories within the current application.
Resume: Resumes the display of advisories within the current application.
Using the Menu with a Keyboard
When the 5-Way Control option is used, the Instant Text menu uses a small bullet on the left to indicate the current choice. In addition, once once the menu is displayed by the Menu-Menu M command (or using the command bar), the 5-way navigator can be used to select menu choices without a pen.

Initially, the default choice is the Current Glossary.
- Up and Down move the current choice one position up or down.
- Left and Right toggle between the upper part of the menu, containing the
Instant Text menu choices, and the lower part containing the Glossary List. - The Center button enters the current choice
On a foldable keyboard, direction keys can be used in a similar manner.
Selecting in Advisories with a Keyboard
Entering words and phrases displayed in advisories can also be done with the
- Up and Down move the current choice up or down
- Left and Right switch advisories.
- The Center button enters the current choice
The default choice is the top word, or the top phrase if there is no word entry.
On a foldable keyboard, direction keys can be used in a similar manner. You can use a semi-colon to expand the current selection.
The Importer for Instant Text Mobile
The installation of Instant Text Mobile creates a folder on your desktop computer with several useful glossaries. In addition, it installs the Importer for Instant Text Mobile, a program that offers several ways to create glossaries and to import lists created by other programs.
Glossaries for Instant Text Mobile are in two possible formats: On the Desktop PC, they are kept in the text format of Instant Text Glossary files — the same format that is used by the PC version of Instant Text. To work on a Palm device, these files must be converted to the Palm Data Base (PDB) format of Instant Text PDB files. The diagram below illustrates the conversions achieved by six gray buttons of the Importer:

Text File and Formulas offer two ways to convert simple text files into Instant Text Glossary files. Three other buttons are for converting lists that are in a Palm Data Base format. For more information on these conversions, please consult the extensive online help that comes with the Importer.
Once you have an Instant Text Glossary file, it can be converted to an Instant Text PDB file and downloaded to your Palm device. If you add entries to a glossary on the Palm device, you can upload the PDB file to the desktop PC and convert it back to an Instant Text Glossary file.
As glossaries for Instant Text Mobile use the same format as those for the PC version of Instant Text you can use a number of such glossaries that are available on the Internet (public domain or commercial). See the Instant Text Glossary Exchange.
Registering Instant Text Mobile
The demo version is fully functional and can be used freely. The demo will stop functioning after ten days, after which you can get another ten-day evaluation period by uninstalling and reinstalling the demo. After registration, the software becomes a registered version usable without any time limitation.
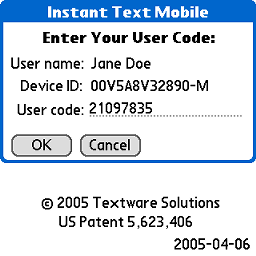
Registration of Instant Text Mobile is done from the About - Register panel. The User code can be based either on the User name or on the Device serial number. (Textware Solutions provides a User code based on the Device number if the User name is not a personal identifier.)
Instant Text Mobile registration can be ordered from the Instant Text Mobile order page.
|
Read This First User's Manual Instant Text Mobile Options |
License Textware Solutions Instant Text Mobile Forum |
Copyright © 2005 Textware Solutions.